
How to Switch Models
This guide is intended for existing Coding Flow users who want to switch models. It is not a beginner's getting-started tutorial.
Before you start, make sure you have completed the following
- You have an active Coding Flow subscription and a valid API Key.
- You have configured the correct endpoint URL for your tool (see the table below).
- You have confirmed that your tool can successfully call an existing GLM model (for example,
glm-5.1). If the basic call fails, please troubleshoot that issue first.
| Protocol | Endpoint URL |
|---|---|
| OpenAI Chat Completions | https://api.codingflow.ai/v1 |
| Anthropic Messages | https://api.codingflow.ai |
| Google Gemini | https://api.codingflow.ai |
Option 1: Switch in Claude Code
Step 1 Change the Default Configuration
The location of the Claude Code configuration file differs across operating systems. Please edit it according to your OS.
GLM-5.2 Environment Variable Configuration
Regardless of the platform, you need to add or replace the following environment variables in the settings.json configuration file:
{
  "env": {
    "CLAUDE_CODE_AUTO_COMPACT_WINDOW": "1000000",
    "ANTHROPIC_DEFAULT_HAIKU_MODEL": "glm-4.7",
    "ANTHROPIC_DEFAULT_SONNET_MODEL": "glm-5.2[1m]",
    "ANTHROPIC_DEFAULT_OPUS_MODEL": "glm-5.2[1m]"
  }
}macOS
The configuration file is located at ~/.claude/settings.json. You can open and edit it in either of the following ways:
- Method 1 (Terminal): Open the file with
vim ~/.claude/settings.json. After editing, pressESCand type:wqto save. - Method 2 (Finder): Open Finder → Go to Folder → enter
~/.claude/settings.json, then locate and edit the configuration file.
Windows
The configuration file is located at %USERPROFILE%\.claude\settings.json. Create or open the file in PowerShell:
New-Item -ItemType Directory -Force -Path "$env:USERPROFILE\.claude"
notepad "$env:USERPROFILE\.claude\settings.json"You can also paste %USERPROFILE%\.claude into the address bar of File Explorer to open the folder directly.
Note
If you use Git Bash or WSL, ~/.claude may resolve to a different home directory. Make sure you are editing the same configuration file that the currently launched Claude Code installation reads.
Linux / WSL
The configuration file is located at ~/.claude/settings.json. Create or open the file:
mkdir -p ~/.claude
${EDITOR:-nano} ~/.claude/settings.jsonNote
If you use both WSL and native Windows Claude Code, the configuration file location may differ. Make sure you are editing the configuration file used by the Claude Code installation you actually launch.
Using the 1M Context
Enabling the GLM 1M Context
- The model name must have the
[1m]suffix, i.e.,glm-5.2[1m]. - Also configure the compaction window size parameter
"CLAUDE_CODE_AUTO_COMPACT_WINDOW": "1000000". - If Claude Code reports that the model does not exist after adding the
[1m]suffix, please upgrade Claude Code to the latest version and try again.
Switching effort (Reasoning Intensity)
In a Claude Code session, type the /effort command to switch the reasoning intensity. After switching, Claude Code internally maps the selected effort to the effort that actually takes effect in GLM-5.2, as shown below:
| effort selected in Claude Code | effort actually mapped in GLM-5.2 |
|---|---|
| low, medium, high (default) | high |
| xhigh, max, ultracode | max |
Recommendation
For coding tasks, it is recommended to switch to max effort for deeper reasoning and more stable performance on complex tasks.
Step 2 Confirm the Model Has Been Switched
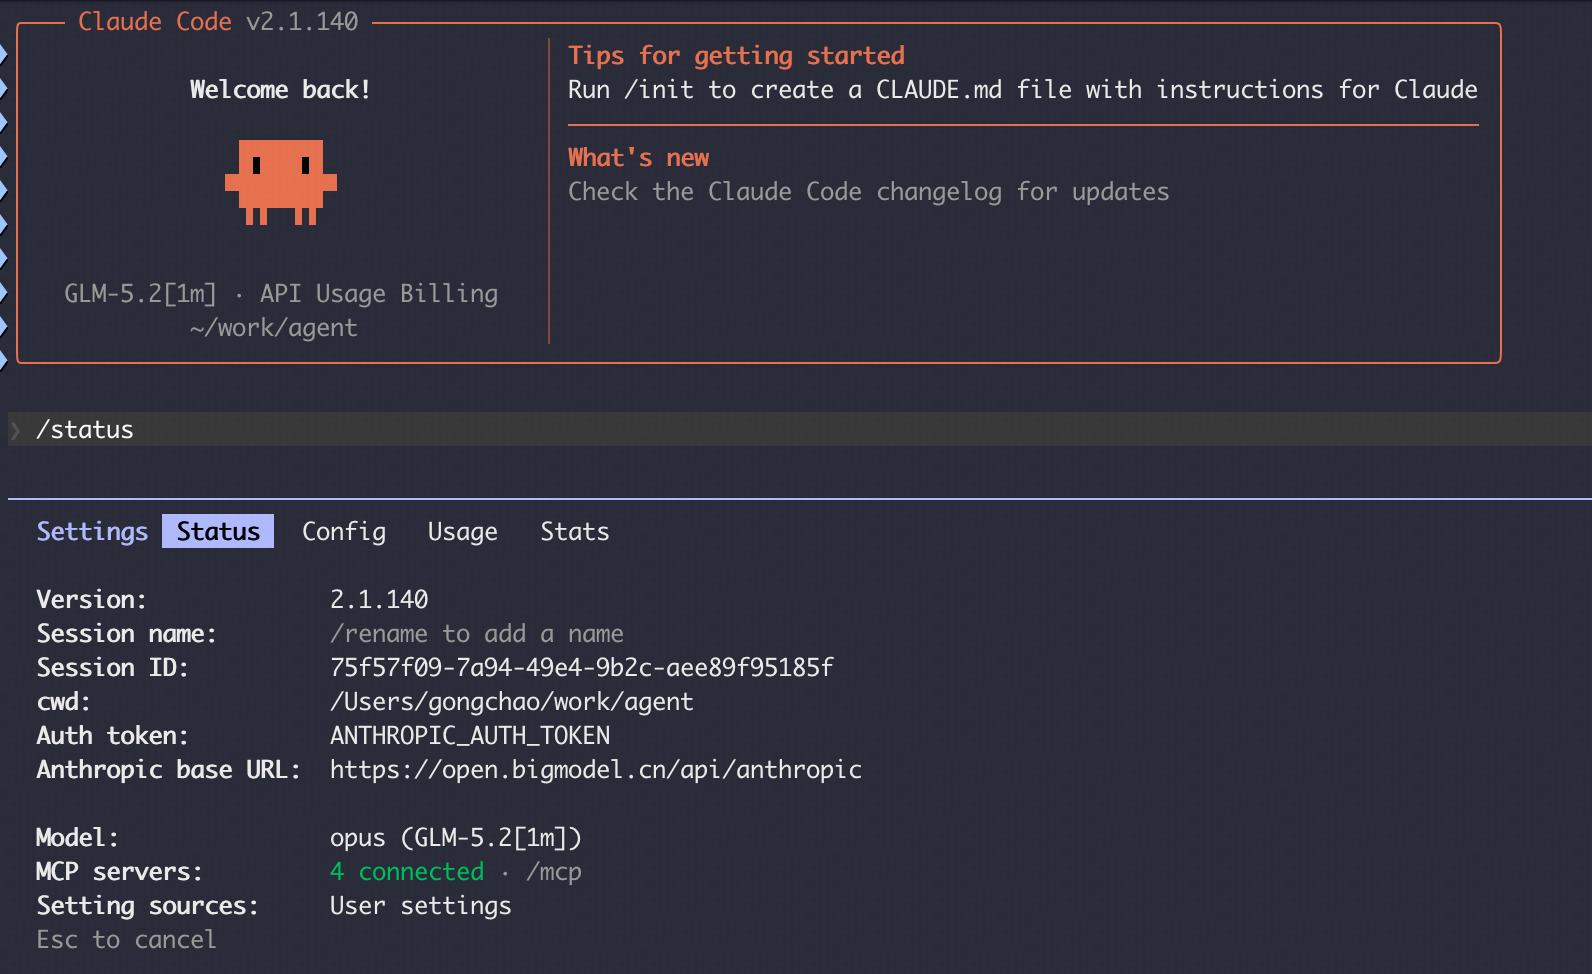
Launch a new command-line window, run claude to start Claude Code, and type /status in Claude Code to confirm the model status:
Settings sourceshows your~/.claude/settings.json.Modelshowsglm-5.2orglm-5.2[1m].
Option 2: Switch Using a Tool
Using cc switch as an example:
1. Install cc switch
Go to the cc switch official website to start the download. Website: https://ccswitch.io/en/
2. Add a New Provider
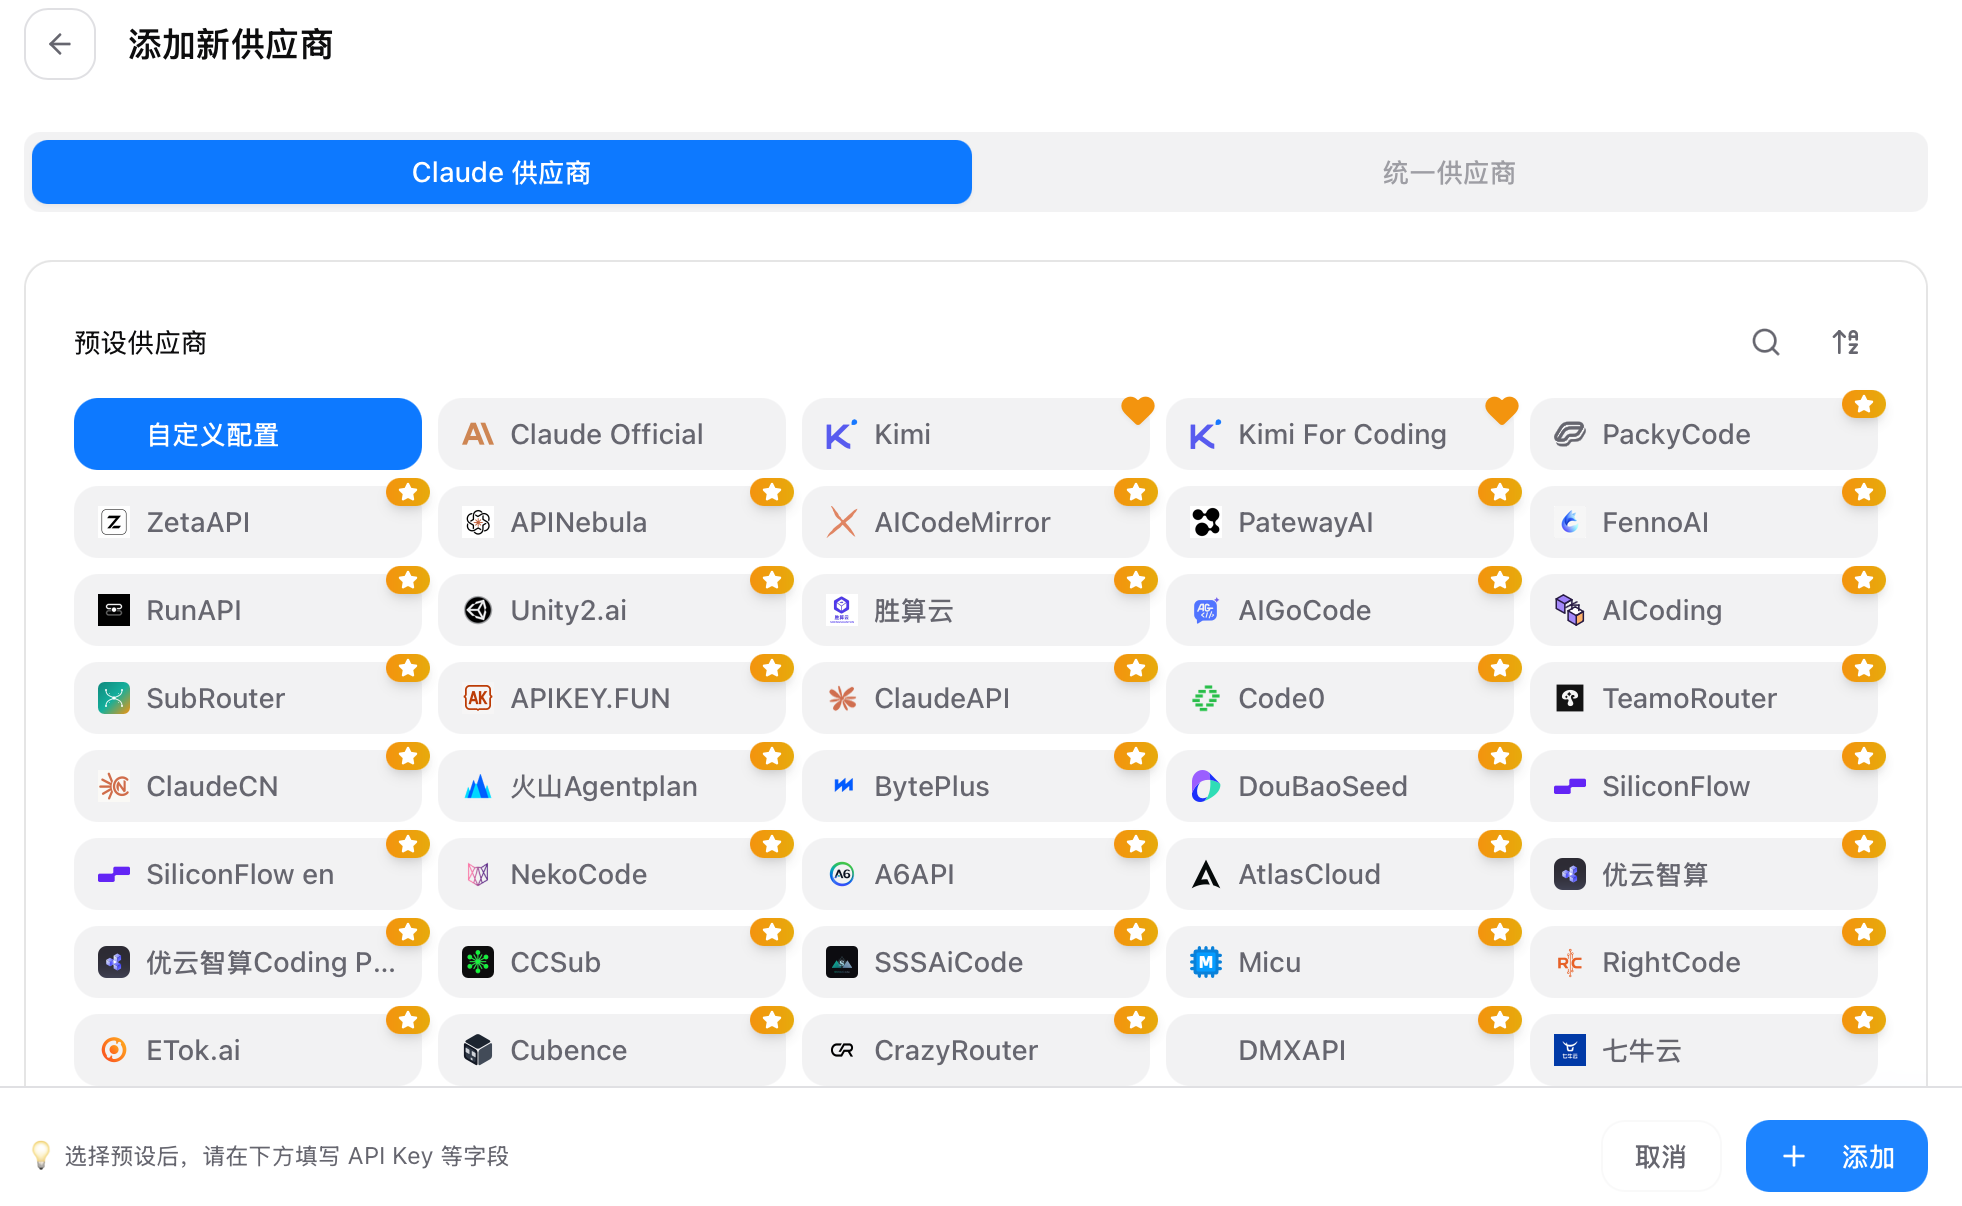
Click "+" to add a new provider and configure it, then select Custom Configuration.
3. Fill in the Basic Information
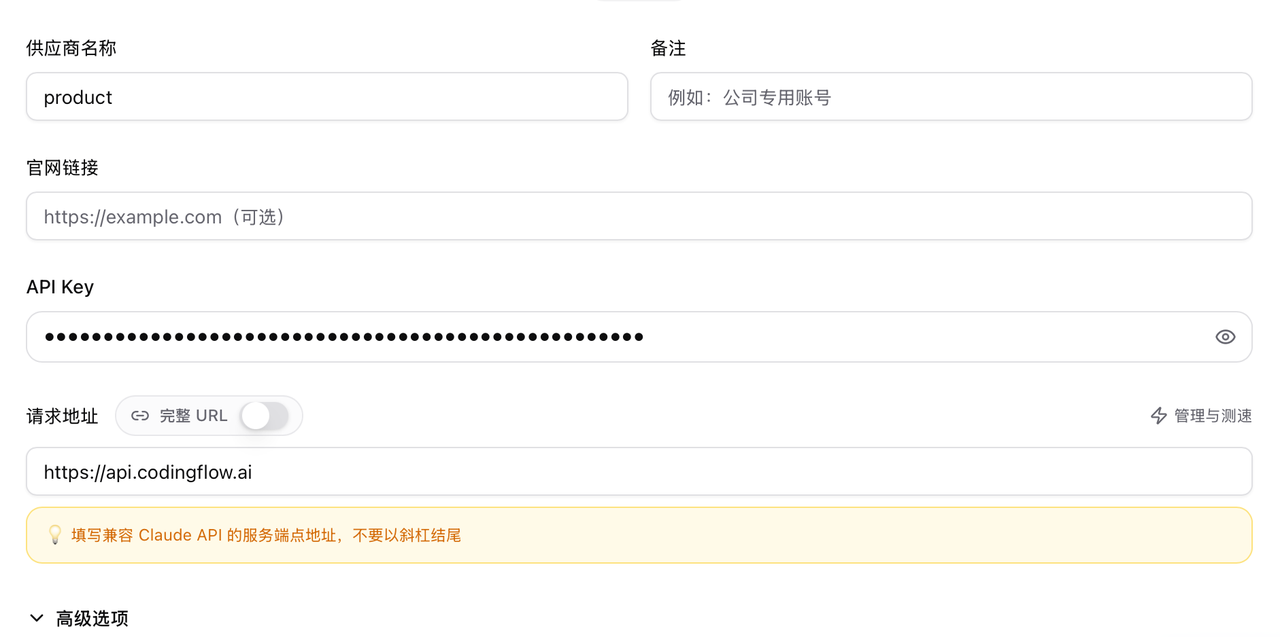
Scroll down for detailed configuration and fill in the relevant information as follows:
- Provider Name: Your custom name.
- API Key: Create a new API Key via the Coding Flow Console, in the format
sk-apv-cp-xxxxxx. - Request URL:
https://api.codingflow.ai
4. Fill in the Environment Variables
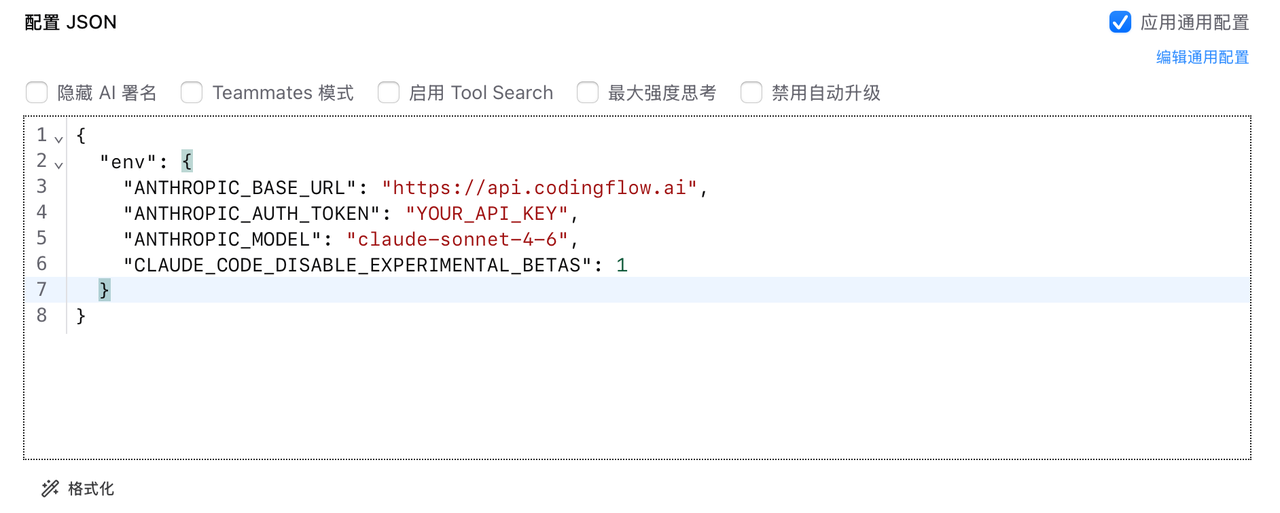
Continue filling in the relevant information as follows:
ANTHROPIC_BASE_URL: The API URL of the model provider, fixed tohttps://api.codingflow.ai.ANTHROPIC_AUTH_TOKEN: The authentication key. Enter your API Key (here it isYOUR_API_KEY).ANTHROPIC_MODEL: The model name.CLAUDE_CODE_DISABLE_EXPERIMENTAL_BETAS: Set to1to forcibly disable all experimental Beta features.
5. Complete the Setup
Click Add to complete the configuration.